Introduction
Detectron 2 is a next-generation open-source object detection system from Facebook AI Research. With the repo you can use and train the various state-of-the-art models for detection tasks such as bounding-box detection, instance and semantic segmentation, and person keypoint detection.
The following is the directory tree of detectron 2:
detectron2
├─checkpoint <- checkpointer and model catalog handlers
├─config <- default configs and handlers
├─data <- dataset handlers and data loaders
├─engine <- predictor and trainer engines
├─evaluation <- evaluator for each dataset
├─export <- converter of detectron2 models to caffe2 (ONNX)
├─layers <- custom layers e.g. deformable conv.
├─model_zoo <- pre-trained model links and handler
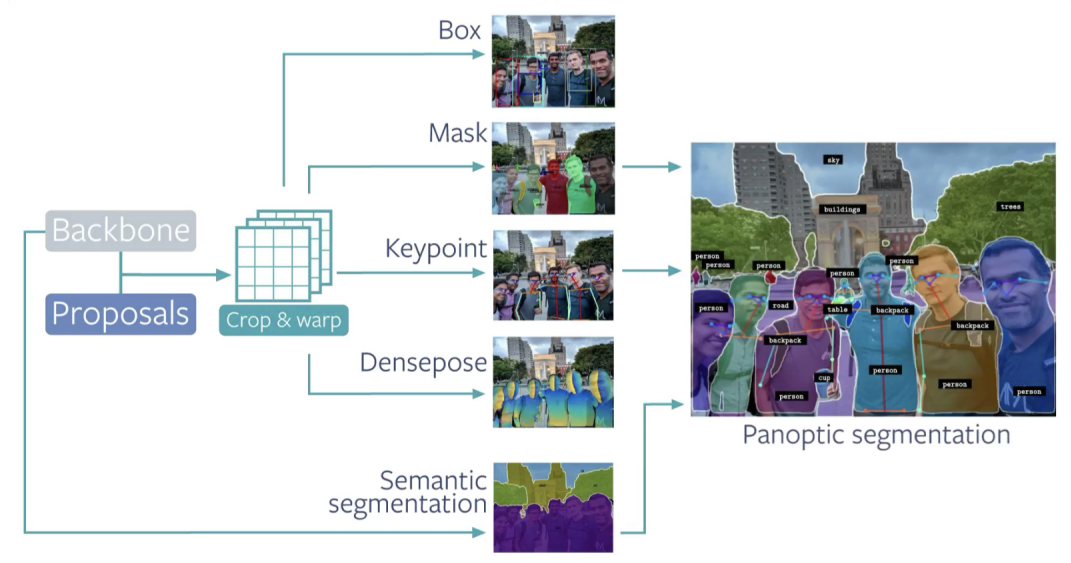
├─modeling
│ ├─meta_arch <- meta architecture e.g. R-CNN, RetinaNet
│ ├─backbone <- backbone network e.g. ResNet, FPN
│ ├─proposal_generator <- region proposal network
│ └─roi_heads <- head networks for pooled ROIs e.g. box, mask heads
├─solver <- optimizer and scheduler builders
├─structures <- structure classes e.g. Boxes, Instances, etc
└─utils <- utility modules e.g. visualizer, logger, etc
Installation
%%time
!pip install -U torch==1.4+cu100 torchvision==0.5+cu100 -f https://download.pytorch.org/whl/torch_stable.html;
!pip install cython pyyaml==5.1;
!pip install -U 'git+https://github.com/cocodataset/cocoapi.git#subdirectory=PythonAPI';
!pip install detectron2 -f https://dl.fbaipublicfiles.com/detectron2/wheels/cu100/index.html;

from detectron2 import model_zoo
from detectron2.engine import DefaultPredictor
from detectron2.config import get_cfg
from detectron2.utils.visualizer import Visualizer
from detectron2.data import MetadataCatalog
Inference on pre-trained models
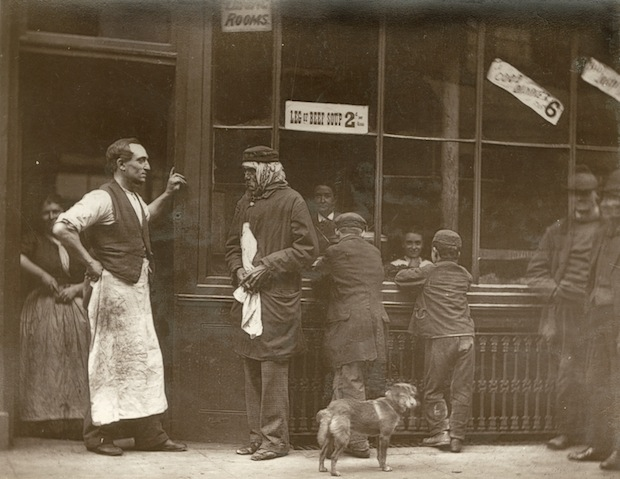
Original image
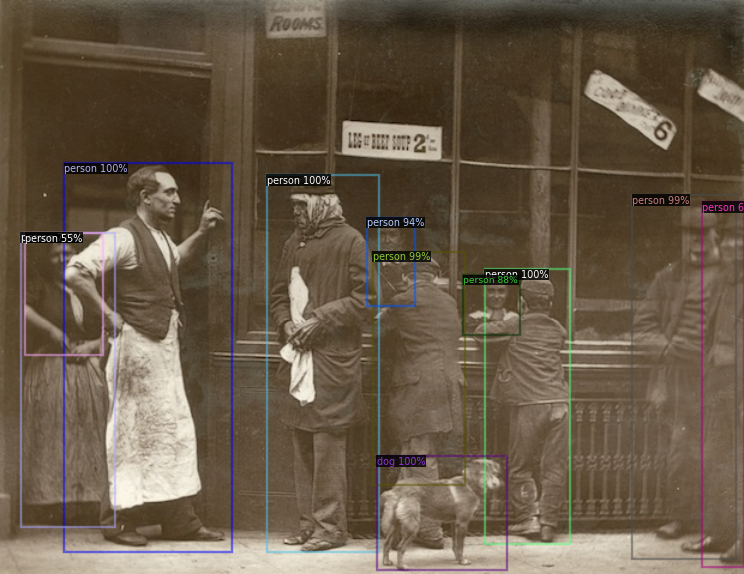
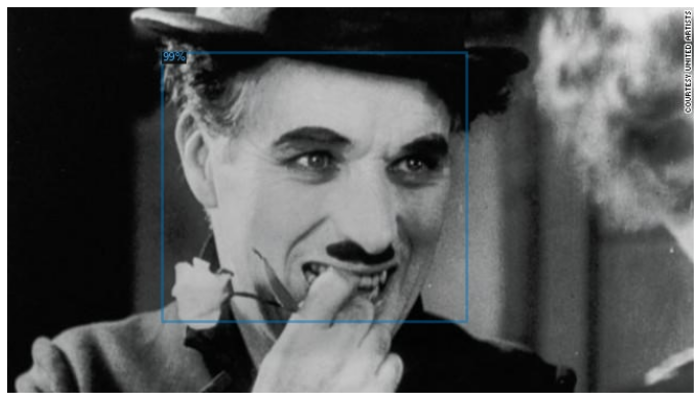
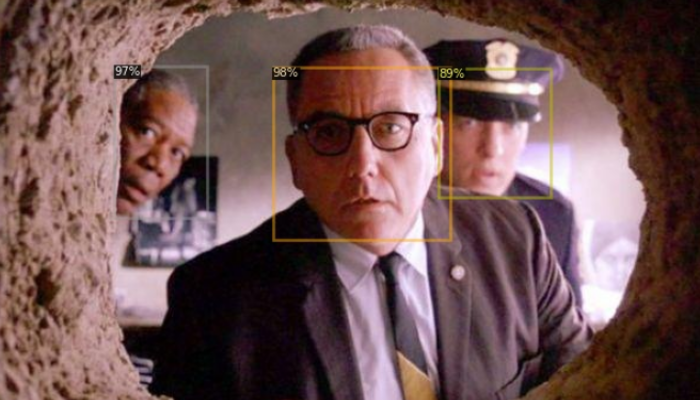
Object detection with Faster-RCNN-101

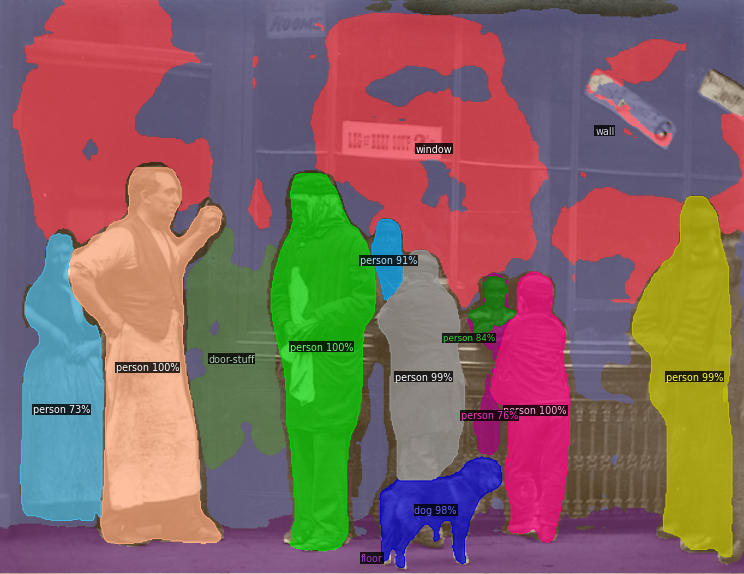
Instance segmentation with Mask-RCNN-50
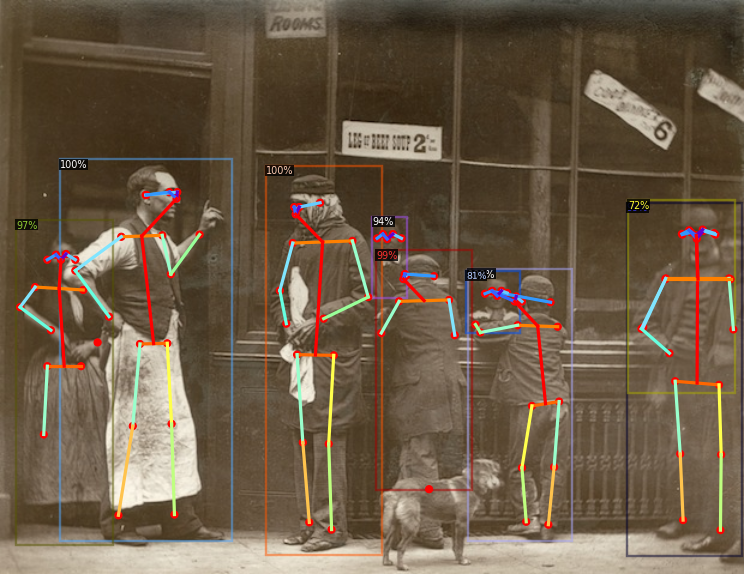
Keypoint estimation with Keypoint-RCNN-50
Panoptic segmentation with Panoptic-FPN-101
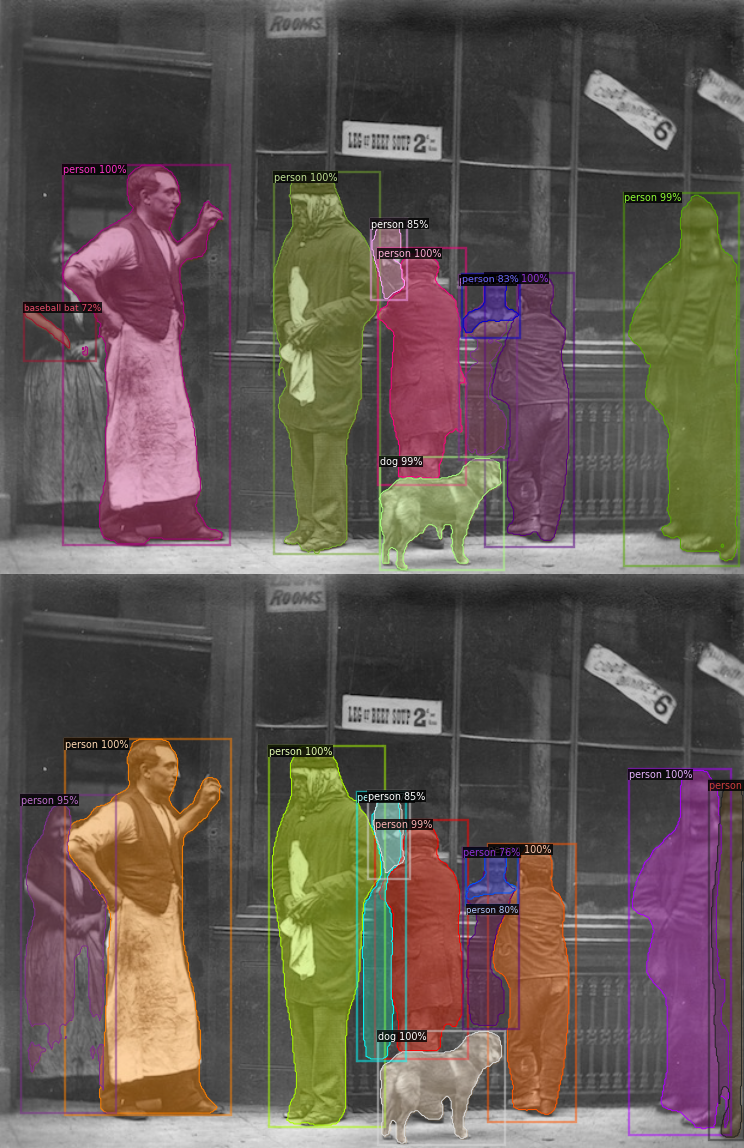
Default Mask R-CNN (top) vs. Mask R-CNN with PointRend (bottom) comparison
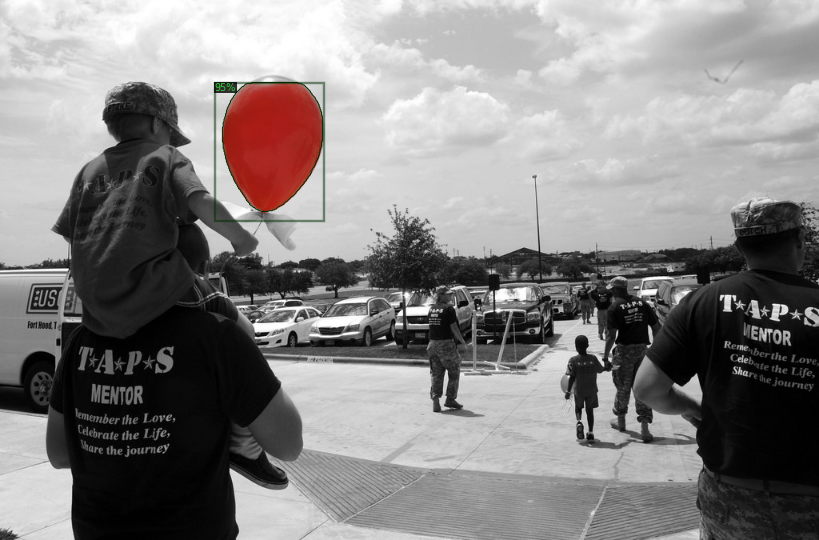
Fine-tuning Balloons Dataset
Load the data
# download, decompress the data
!wget https://github.com/matterport/Mask_RCNN/releases/download/v2.1/balloon_dataset.zip
!unzip balloon_dataset.zip > /dev/null
Convert dataset into Detectron2's standard format
from detectron2.structures import BoxMode
# write a function that loads the dataset into detectron2's standard format
def get_balloon_dicts(img_dir):
    json_file = os.path.join(img_dir, "via_region_data.json")
    with open(json_file) as f:
        imgs_anns = json.load(f)

    dataset_dicts = []
    for _, v in imgs_anns.items():
        record = {}

        filename = os.path.join(img_dir, v["filename"])
        height, width = cv2.imread(filename).shape[:2]

        record["file_name"] = filename
        record["height"] = height
        record["width"] = width

        annos = v["regions"]
        objs = []
        for _, anno in annos.items():
            assert not anno["region_attributes"]
            anno = anno["shape_attributes"]
            px = anno["all_points_x"]
            py = anno["all_points_y"]
            poly = [(x + 0.5, y + 0.5) for x, y in zip(px, py)]
            poly = list(itertools.chain.from_iterable(poly))

            obj = {
                "bbox": [np.min(px), np.min(py), np.max(px), np.max(py)],
                "bbox_mode": BoxMode.XYXY_ABS,
                "segmentation": [poly],
                "category_id": 0,
                "iscrowd": 0
            }
            objs.append(obj)
        record["annotations"] = objs
        dataset_dicts.append(record)
    return dataset_dicts

from detectron2.data import DatasetCatalog, MetadataCatalog
for d in ["train", "val"]:
    DatasetCatalog.register("balloon/" + d, lambda d=d: get_balloon_dicts("balloon/" + d))
    MetadataCatalog.get("balloon/" + d).set(thing_classes=["balloon"])
balloon_metadata = MetadataCatalog.get("balloon/train")
Model configuration and training
from detectron2.engine import DefaultTrainer
from detectron2.config import get_cfg

cfg = get_cfg()
cfg.merge_from_file(model_zoo.get_config_file("COCO-InstanceSegmentation/mask_rcnn_R_50_FPN_3x.yaml"))
cfg.DATASETS.TRAIN = ("balloon/train",)
cfg.DATASETS.TEST = ()   # no metrics implemented for this dataset
cfg.DATALOADER.NUM_WORKERS = 2
cfg.MODEL.WEIGHTS = model_zoo.get_checkpoint_url("COCO-InstanceSegmentation/mask_rcnn_R_50_FPN_3x.yaml")
cfg.SOLVER.IMS_PER_BATCH = 2
cfg.SOLVER.BASE_LR = 0.00025
cfg.SOLVER.MAX_ITER = 300    # 300 iterations seems good enough, but you can certainly train longer
cfg.MODEL.ROI_HEADS.BATCH_SIZE_PER_IMAGE = 128   # faster, and good enough for this toy dataset
cfg.MODEL.ROI_HEADS.NUM_CLASSES = 1  # only has one class (ballon)

os.makedirs(cfg.OUTPUT_DIR, exist_ok=True)
trainer = DefaultTrainer(cfg)
trainer.resume_or_load(resume=False)
trainer.train()
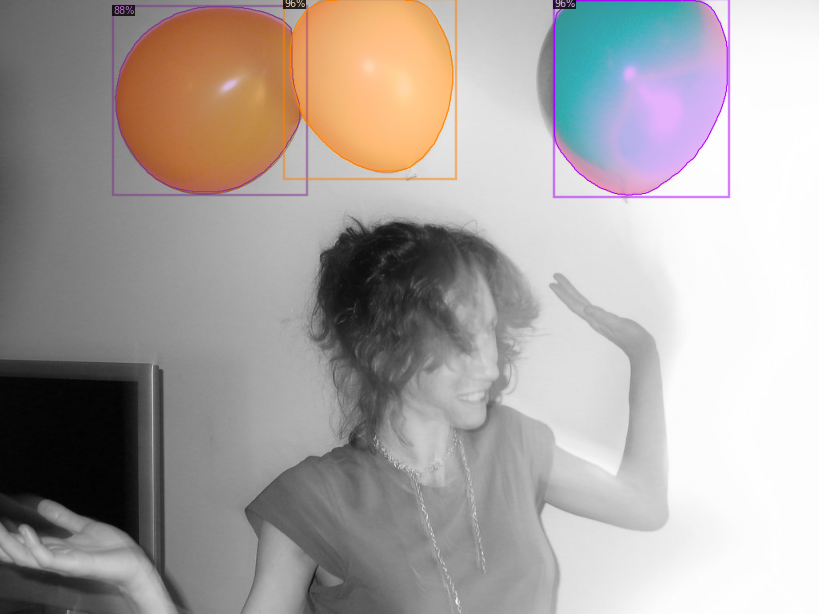
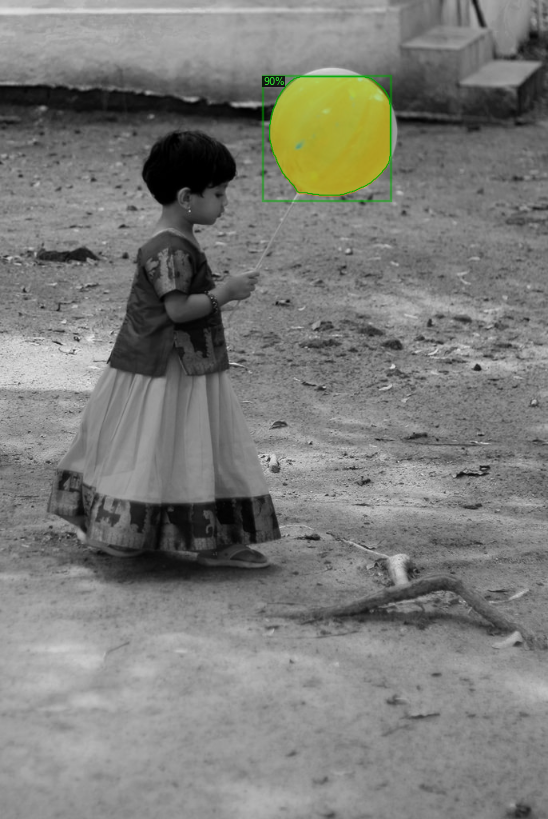
Inference and Visualization
from detectron2.utils.visualizer import ColorMode

# load weights
cfg.MODEL.WEIGHTS = os.path.join(cfg.OUTPUT_DIR, "model_final.pth")
cfg.MODEL.ROI_HEADS.SCORE_THRESH_TEST = 0.7   # set the testing threshold for this model
# Set training data-set path
cfg.DATASETS.TEST = ("balloon/val", )
# Create predictor (model for inference)
predictor = DefaultPredictor(cfg)

dataset_dicts = get_balloon_dicts("balloon/val")
for d in random.sample(dataset_dicts, 3):
    im = cv2.imread(d["file_name"])
    outputs = predictor(im)
    v = Visualizer(im[:, :, ::-1],
                   metadata=balloon_metadata,
                   scale=0.8,
                   instance_mode=ColorMode.IMAGE_BW   # remove the colors of unsegmented pixels
    )
    v = v.draw_instance_predictions(outputs["instances"].to("cpu"))
    cv2_imshow(v.get_image()[:, :, ::-1])
Fine-tuning Chip Dataset
Load the data
#get the dataset
!pip install -q kaggle
!pip install -q kaggle-cli
os.environ['KAGGLE_USERNAME'] = "sparshag"
os.environ['KAGGLE_KEY'] = "1b1f894d1fa6febe9676681b44ad807b"
!kaggle datasets download -d tannergi/microcontroller-detection
!unzip microcontroller-detection.zip
Convert dataset into Detectron2's standard format
# Registering the dataset
from detectron2.structures import BoxMode
def get_microcontroller_dicts(csv_file, img_dir):
    df = pd.read_csv(csv_file)
    df['filename'] = df['filename'].map(lambda x: img_dir+x)

    classes = ['Raspberry_Pi_3', 'Arduino_Nano', 'ESP8266', 'Heltec_ESP32_Lora']

    df['class_int'] = df['class'].map(lambda x: classes.index(x))

    dataset_dicts = []
    for filename in df['filename'].unique().tolist():
        record = {}

        height, width = cv2.imread(filename).shape[:2]

        record["file_name"] = filename
        record["height"] = height
        record["width"] = width

        objs = []
        for index, row in df[(df['filename']==filename)].iterrows():
          obj= {
              'bbox': [row['xmin'], row['ymin'], row['xmax'], row['ymax']],
              'bbox_mode': BoxMode.XYXY_ABS,
              'category_id': row['class_int'],
              "iscrowd": 0
          }
          objs.append(obj)
        record["annotations"] = objs
        dataset_dicts.append(record)
    return dataset_dicts

classes = ['Raspberry_Pi_3', 'Arduino_Nano', 'ESP8266', 'Heltec_ESP32_Lora']
for d in ["train", "test"]:
  DatasetCatalog.register('microcontroller/' + d, lambda d=d: get_microcontroller_dicts('Microcontroller Detection/' + d + '_labels.csv', 'Microcontroller Detection/' + d+'/'))
  MetadataCatalog.get('microcontroller/' + d).set(thing_classes=classes)
microcontroller_metadata = MetadataCatalog.get('microcontroller/train')
Model configuration and training
# Train the model
cfg = get_cfg()
cfg.merge_from_file(model_zoo.get_config_file("COCO-Detection/faster_rcnn_R_101_FPN_3x.yaml"))
cfg.DATASETS.TRAIN = ('microcontroller/train',)
cfg.DATASETS.TEST = ()   # no metrics implemented for this dataset
cfg.DATALOADER.NUM_WORKERS = 2
cfg.MODEL.WEIGHTS = model_zoo.get_checkpoint_url("COCO-Detection/faster_rcnn_R_101_FPN_3x.yaml")
cfg.SOLVER.IMS_PER_BATCH = 2
cfg.SOLVER.MAX_ITER = 1000
cfg.MODEL.ROI_HEADS.NUM_CLASSES = 4

os.makedirs(cfg.OUTPUT_DIR, exist_ok=True)
trainer = DefaultTrainer(cfg)
trainer.resume_or_load(resume=False)
trainer.train()
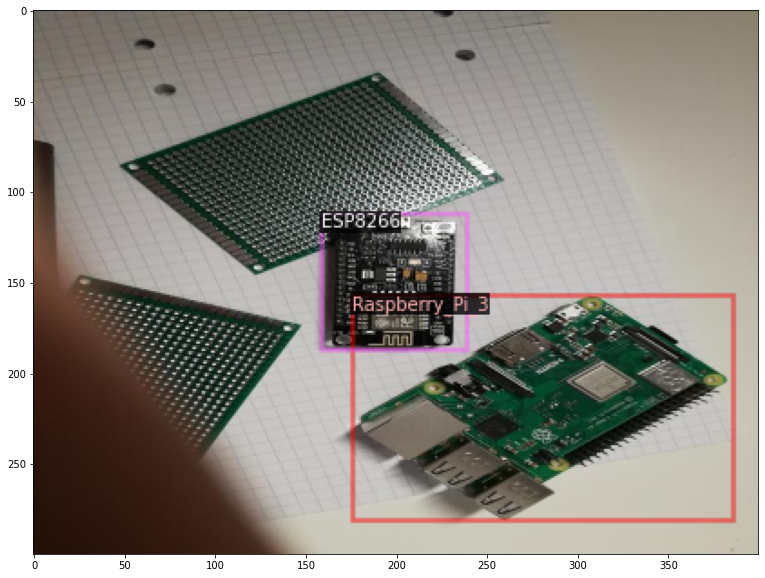

Inference and Visualization
cfg.MODEL.WEIGHTS = os.path.join(cfg.OUTPUT_DIR, "model_final.pth")
cfg.MODEL.ROI_HEADS.SCORE_THRESH_TEST = 0.8   # set the testing threshold for this model
cfg.DATASETS.TEST = ('microcontroller/test', )
predictor = DefaultPredictor(cfg)

df_test = pd.read_csv('Microcontroller Detection/test_labels.csv')

dataset_dicts = DatasetCatalog.get('microcontroller/test')
for d in random.sample(dataset_dicts, 3):
    im = cv2.imread(d["file_name"])
    outputs = predictor(im)
    v = Visualizer(im[:, :, ::-1],
                   metadata=microcontroller_metadata,
                   scale=0.8
                   )
    v = v.draw_instance_predictions(outputs["instances"].to("cpu"))
    cv2_imshow(v.get_image()[:, :, ::-1])
Real-time Webcam inference
from IPython.display import display, Javascript
from google.colab.output import eval_js
from base64 import b64decode

def take_photo(filename='photo.jpg', quality=0.8):
  js = Javascript('''
    async function takePhoto(quality) {
      const div = document.createElement('div');
      const capture = document.createElement('button');
      capture.textContent = 'Capture';
      div.appendChild(capture);

      const video = document.createElement('video');
      video.style.display = 'block';
      const stream = await navigator.mediaDevices.getUserMedia({video: true});

      document.body.appendChild(div);
      div.appendChild(video);
      video.srcObject = stream;
      await video.play();

      // Resize the output to fit the video element.
      google.colab.output.setIframeHeight(document.documentElement.scrollHeight, true);

      // Wait for Capture to be clicked.
      await new Promise((resolve) => capture.onclick = resolve);

      const canvas = document.createElement('canvas');
      canvas.width = video.videoWidth;
      canvas.height = video.videoHeight;
      canvas.getContext('2d').drawImage(video, 0, 0);
      stream.getVideoTracks()[0].stop();
      div.remove();
      return canvas.toDataURL('image/jpeg', quality);
    }
    ''')
  display(js)
  data = eval_js('takePhoto({})'.format(quality))
  binary = b64decode(data.split(',')[1])
  with open(filename, 'wb') as f:
    f.write(binary)
  return filename

from IPython.display import Image
try:
  filename = take_photo()
  print('Saved to {}'.format(filename))

  # Show the image which was just taken.
  display(Image(filename))
except Exception as err:
  # Errors will be thrown if the user does not have a webcam or if they do not
  # grant the page permission to access it.
  print(str(err))
model_path = '/content/output/model_final.pth'
config_path= model_zoo.get_config_file("COCO-Detection/faster_rcnn_R_101_FPN_3x.yaml")

# Create config
cfg = get_cfg()
cfg.merge_from_file(config_path)
cfg.MODEL.ROI_HEADS.SCORE_THRESH_TEST = 0.1
cfg.MODEL.WEIGHTS = model_path

predictor = DefaultPredictor(cfg)

im = cv2.imread('photo.jpg')
outputs = predictor(im)

v = Visualizer(im[:, :, ::-1], MetadataCatalog.get(cfg.DATASETS.TRAIN[0]), scale=1.2)
v = v.draw_instance_predictions(outputs["instances"].to("cpu"))
cv2_imshow(v.get_image()[:, :, ::-1])
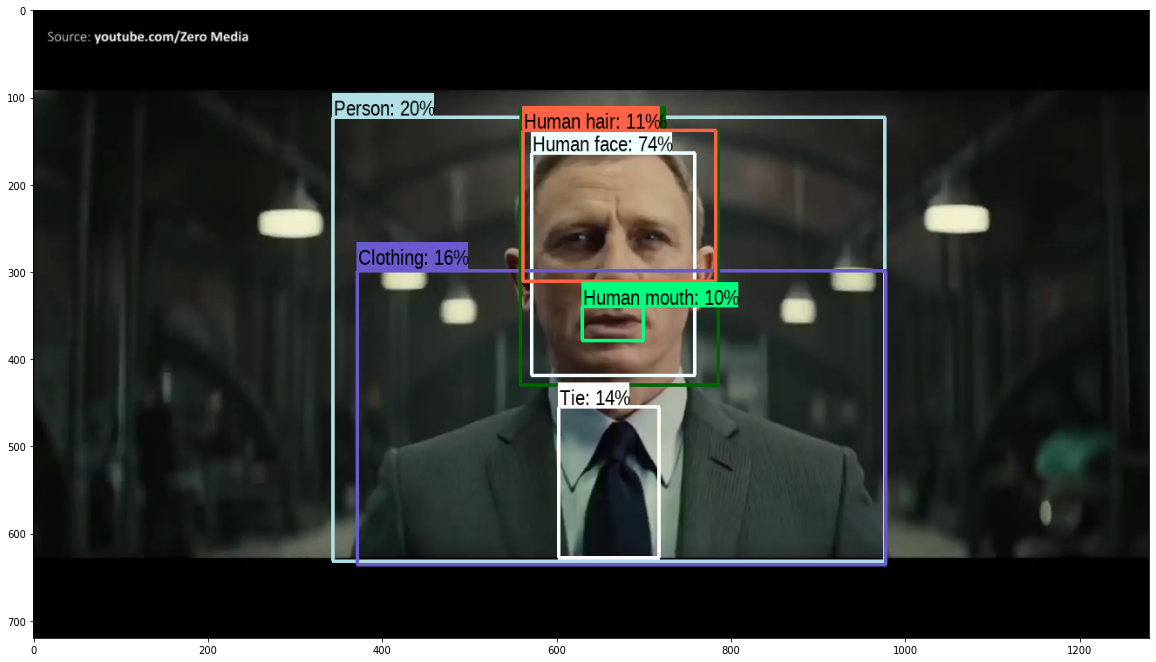
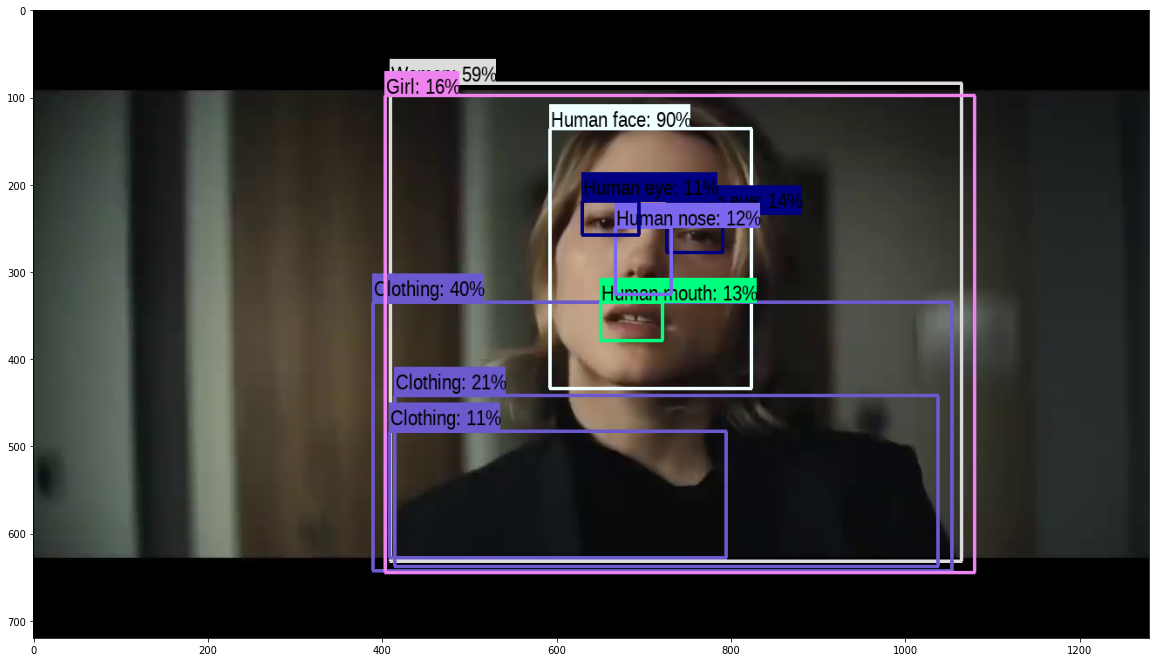
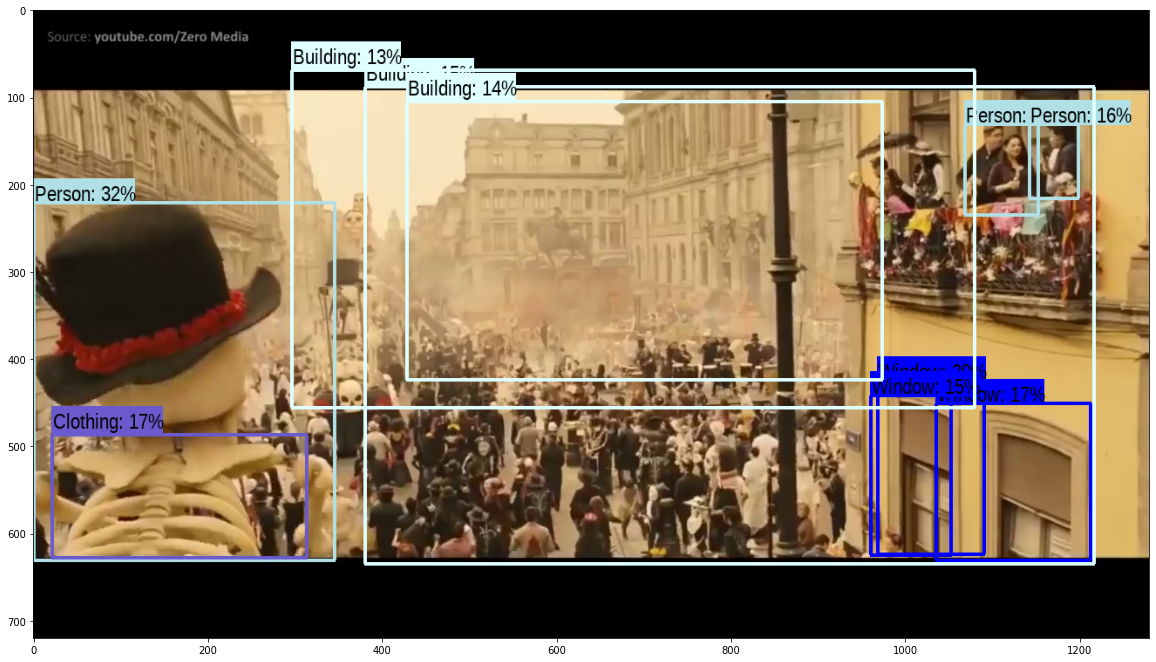
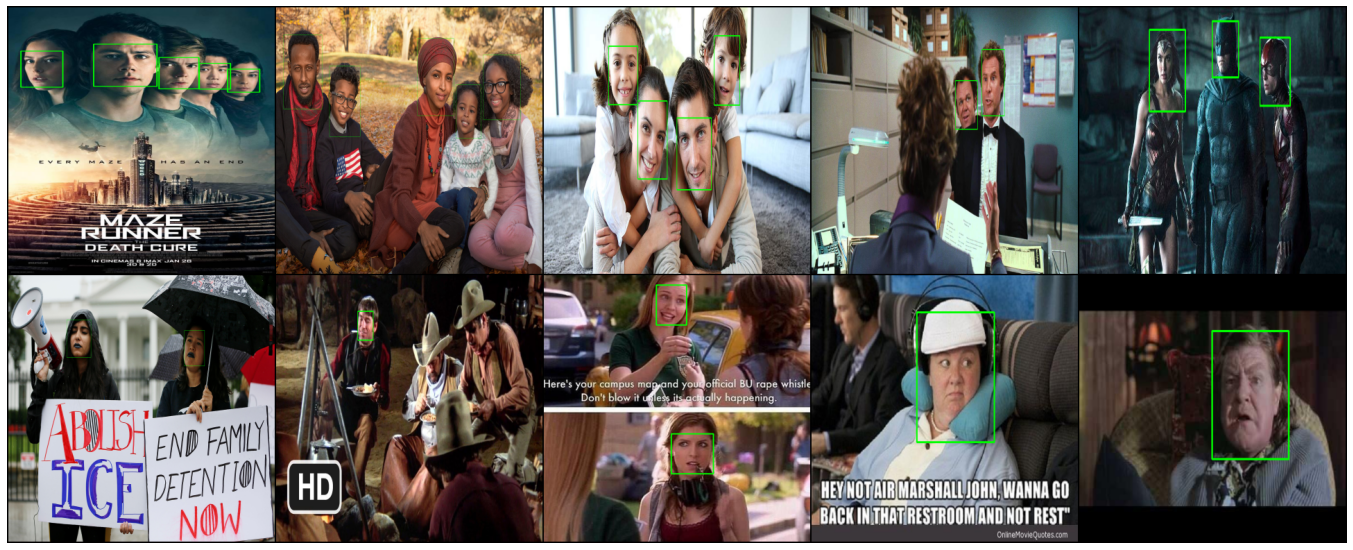
Fine-tuning on Face dataset
The process is same. Here is the output.
Behind the scenes
References
- How to embed Detectron2 in your computer vision project - blogpost
- Detectron2 Train a Instance Segmentation Model by Gilbert Tanner
- How to train Detectron2 with Custom COCO Datasets - DLology
- Character Recognition and Segmentation For Custom Data Using Detectron2 - blogpost
- Training models with Panoptic Segmentation in Detectron2
- Image segmentation using Detectron2 - Kaggle
- A Beginner’s Guide To Object Detection And Computer Vision With Facebook’s Detectron2
- Face Detection on Custom Dataset with Detectron2 and PyTorch using Python
- My Experiment Notion
- Official Colab
- Official Slide
- Official Git